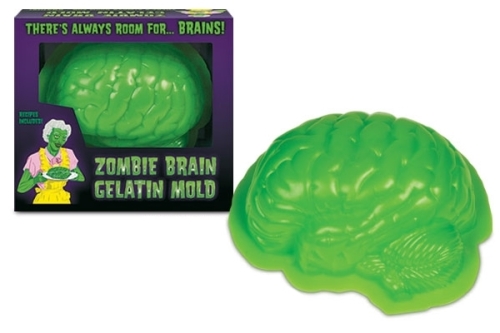
“There’s Always Room for. . .Brains!”
Jello tastes great but sometimes it looks a little boring. Fortunately there’s a gelatin mold for zombie lovers to add some gross fun to the preparation of this jiggly treat.
The Zombie Brain Gelatin Mold is supposed to create a very realistic looking left hemisphere of the human brain. Does it really work? Is it good quality? I took to the kitchen with my son to answer these questions and more!
I know what you’re thinking. Why on earth are we reviewing a zombie gelatin mold? Because we can! That’s why! On a more serious note, ask yourself how many times you’ve been disappointed after buying a product. Kitchen products are some of the worst offenders. I don’t like surprises any more than any other zombie fan. Since I had a few extra of these on hand (and since we list the Zombie Brain gelatin mold on our site) I decided it was time to put one to the test.
Your purchase gets you one plastic zombie brain gelatin mold in a cardboard box. The box itself is pretty cool. It features the tagline “There’s always room for…brains!” along with a some great zombie art of an adorable zombie mom in an apron holding a plate of zombie gelatin dessert. The box is a thinner cardboard material. Since there isn’t anything much in the way of packing material inside the box, it can be easily crushed,dented, creased etc. It’s just a box though, so who cares!
Actually you might want to protect the box long enough to copy down the recipes on the back. One of the recipes even tells you the perfect combination of food coloring to make a gross gray colored brain!
The mold itself is a very decent quality. The plastic is thick and durable. The green plastic is molded into the shape of a human brain. It is very anatomically correct and impressive in size. The overall dimensions of the mold are about 9″ x 7-3/8″ x 3″ deep.
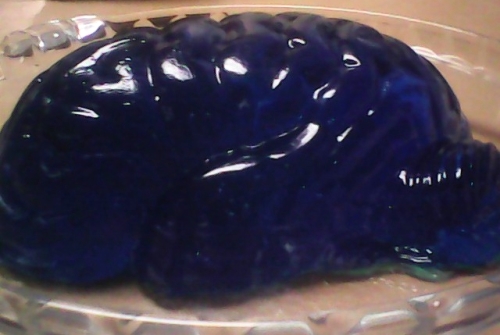
My son wanted “berry blue” flavored gelatin so we mixed it up, poured it in the mold and let it set in the refrigerator. Later that day it was time to remove the gelatin from the mold. I admit I was a little skeptical and a tad worried that our precious brain would break apart when removing the brain mold. I was hoping following the recommendations on the box would pay off and make removing the mold easier. It did!
The box recommended spraying the mold with a vegetable based cooking spray or smearing a light coating of vegetable oil on the mold before filling it to reduce the likelihood of the mold sticking. This seemed to help but the mold was still “suctioned” onto the jello pretty well. I decided filling a shallow dish with some warm/hot water and carefully lowering the outside surface of the mold down into the hot water might help expand the mold, making removal easier. That along with a few taps and shakes got the mold to let go and our delicious brain slid out.
We were two very happy zombie fans when we realized our gelatin zombie brain was perfectly intact. The finished gelatin zombie brain is really big and really thick! It really turned out well as you can see in the photos below. My son insisted on taking the photos himself using his tablet. He did a great job didn’t he? 😉

The Verdict:

What’s not to like? Overall the Zombie Brain Gelatin Mold was much better quality than I expected. With a price tag well under $10.00 this a great way to add some fun to a low calorie dessert. Things turned out better than I expected and we had some fun in the process! There really isn’t much to complain about and with that in mind I gave this my zombie blessing with a 5 out of 5 brains rating.
Tips for Using the Zombie Brain Gelatin Mold:
1. Follow the basic gelatin recipe mixing directions listed on the zombie brain gelatin mold box. They have a different gelatin mix and water ratio than the one on the gelatin box itself may. The recipe on the box will give you a slightly stiffer finished product that can hold the large shape more easily. It also makes removing the jello much easier since it won’t fall apart easily.
2. Be sure to spray some vegetable cooking spray or smear some vegetable oil on the inside of the mold. This acts as a release agent so the set gelatin doesn’t stick to the mold. You don’t need to overdo it, a light coating is fine.
3. When removing your zombie gelatin brain from the mold, things are much easier if you have a flat surface to work with. A cookie sheet, large flat plate, or even a clean cutting board are all great examples. Once you have your brain out of the mold you can slide it off of the flat surface onto whatever other final dish you would like to use. Ours was actually firm enough we could carefully pick it up and move it without hurting it, but better safe than sorry!
4. If you’re having trouble removing the mold right out of the refrigerator, try warming up the outside of the mold to expand it. I did this by carefully lowering the upside down mold into a dish of hot water for a few minutes. Obviously you need to be careful to NOT let the water get inside the mold or it could mess up your gelatin.
Where Can I Buy A Zombie Brain Gelatin Mold?
Check it out on our site or one of your favorite online retailers.
Brains!!! Make lots of brains!
This would be very cool, I’d love to make brains, but I can’t cook-not even jello-I’m awful in the kitchen, I live off of granola bars and coffee.
the kids would enjoy this one!!